- Top
- Web Screen
- [Setup] screen
- [User mng.] screen
The [User mng.] screen performs the authentication registration to limit the user or computer (IP address) that can access this unit from a computer.
The [User mng.] screen consists of the [User auth.] tab and [Host auth.] tab.
[User auth.] tab
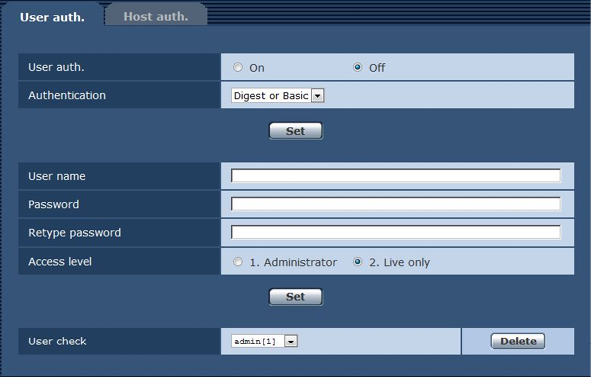
Performs the authentication registration to limit the user that can access this unit from a computer.
A maximum of 18 users can be registered.
|

Item |
Description of settings |
Sets whether to authenticate users. [On]: Authenticates the users. [Off]: Does not authenticate the users.
|
|
[Authentication] |
Sets the authentication method to be used for user authentication. [Digest or Basic]: Uses Digest authentication or Basic authentication. [Digest]: Uses Digest authentication. [Basic]: Uses Basic authentication. After changing the [Authentication] settings, exit your web browser and access again. The authentication set here is the authentication method to access the Web screen. It is always a digest authentication for the connection with the controller.
|
[User name] |
Enter a user name. Number of characters that can be entered: 1 to 32 Characters that cannot be entered: Double-byte and single-byte symbols " & : ; \ Entering a user name that has been already registered and clicking the [Set] button overwrites the user information. |
[Password] [Retype password] |
Enter a password. Number of characters that can be entered: 4 to 32 Characters that cannot be entered: Double-byte and single-byte symbols " & |
Sets the access level for users. [1. Administrator]: Allows full operation of the camera. [2. Live only]: Allows only to display the [Live] screen. No operation and setting of the camera is available.
|
|
[User check] |
Click A registered user is indicated as “registered user name[Access level]”. (Example: admin[1]) Clicking the [Delete] button on the right deletes the selected user. |
[Host auth.] tab
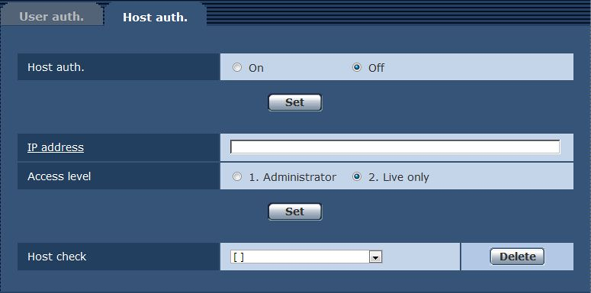
Register host authentication information to restrict computers (IP addresses) that can access the camera.

Item |
Description of settings |
[Host auth.] |
Sets whether to authenticate hosts. [On]: Authenticates the hosts. [Off]: Does not authenticate the hosts.
|
[IP address] |
Enter the IP address of the computer to permit its access to the camera. A host name cannot be entered as an IP address. If the IP address/mask length of subnet is entered, computers that can access the camera can be restricted per subnet. When 192.168.0.1/24 is entered and [1. Administrator] is selected for [Access level], computers with 192.168.0.1 to 192.168.0.254 can access the camera in the access level [1. Administrator]. Entering an IP address that has been already registered and clicking the [Set] button overwrites the host information. |
[Access level] |
Sets the access level for hosts. [1. Administrator]: Allows full operation of the camera. [2. Live only]: Allows only to display the [Live] screen. No operation and setting of the camera is available.
|
[Host check] |
Click A host is indicated as “registered IP address and access level”. (Example: 192.168.0.21[1]) Clicking the [Delete] button on the right deletes the selected host (IP address). |
 NOTE
NOTE