- Top
- Description of Parts
- Top side
Top side
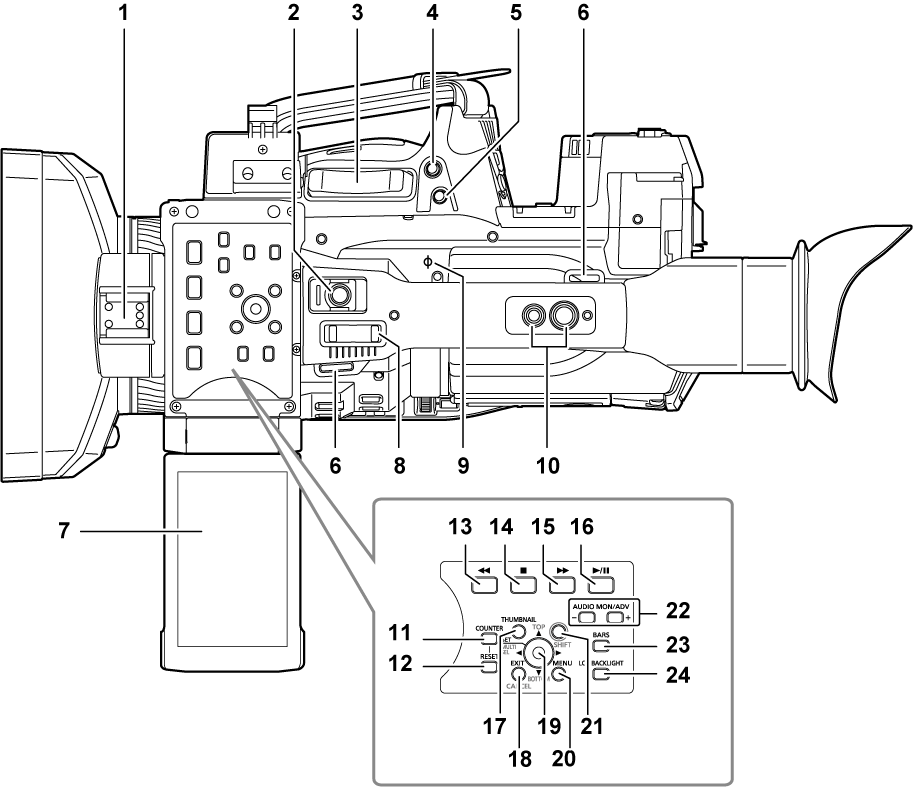
Light shoe
Attach the video light.
Recording button (handle side) (Shooting)
Press this button to start recording. Press it again to stop recording.
This includes hold mechanism.
Zoom lever (grip side) (Adjusting the zoom position)
Adjust the zoom of an image.
<T>: Zoom in the image.
<W>: Zoom out the image.
<IRIS> button (Iris)
Select the method for adjustment of the lens iris.
This button can be used as the USER button (USER8). (Assigning functions to the USER buttons)
<REC CHECK> button (Shooting)
Press this button while recording is suspended, to play back the video and audio of the most recent clip for approximately three seconds.
Shoulder strap attachment (Attaching the shoulder strap)
Attach the shoulder strap.
LCD monitor (Adjusting and setting the LCD monitor)
Zoom lever (handle side) (Adjusting the zoom position)
Adjust the zoom of an image.
<T>: Zoom in the image.
<W>: Zoom out the image.
Focal plane index <
 >
>Indicate the focal plane of the MOS sensor.
It provides a reference for measuring the accurate focal distance from the subject.
Handle mounting holes
Mount the handle.
Mounting hole size
1/4-20 UNC (screw length 5.5 mm or shorter)
3/8-16 UNC (screw length 5.5 mm or shorter)
<COUNTER> button (How to input user bits)
Switch the display item of the counter.
<RESET> button
Reset the display of the time counter.
<
 > button
This works when the thumbnail screen is displayed.
Press this button during a pause to perform fast-reverse playback.
Press this button during playback to perform 4x speed reverse playback.
If it is pressed with playback paused, the clip being played back is paused at its start point (cued state).
<
 > button
This works when the thumbnail screen is displayed.
Press this button to stop playback.
Press this button when you stop interval recording or one-shot recording, or when you end combining to the clip of one-clip recording.
<
 > button
This works when the thumbnail screen is displayed.
Press this button during a pause to perform fast playback.
Press this button during playback to perform 4x speed playback.
If it is pressed with playback paused, the clip being played back is paused at the start point of the next clip (cued state).
<
 /
/ > button
This works when the thumbnail screen is displayed.
Press this button to view playback image.
Press it during playback to pause playback.
<THUMBNAIL> button (Thumbnail screen)
Press the button to display the thumbnail screen on the LCD monitor and viewfinder. Press it again to return to the regular display.
<EXIT>/<CANCEL> buttons (Selecting thumbnails)
Restore the display to the previous state while the setting menu or property screen is displayed.
Press this button while holding down the <SHIFT> button to act as the cancel button. This is convenient, for example, for batch-canceling clip selections.
Control stick (Selecting thumbnails)
Use this button to select a thumbnail or to perform operations of menus and area mode function.
<MENU> button (Setting menu basic operations)
Press this button to display [USER MENU]. Press this button for 3 seconds or more to display the main menu.
Press it while the thumbnail is displayed to display the operation screen of the thumbnail menu, and clips can be deleted.
<SHIFT> button (Selecting thumbnails)
Use this button together with the control stick or other buttons.
Press the control stick upward/downward while holding down the <SHIFT> button.
This moves the cursor to the thumbnail of the clip at the start or the end on the thumbnail screen.
Press the control stick while holding down the <SHIFT> button.
This selects all clips from the previously selected clip up to the clip at the cursor position.
Press the <EXIT>/<CANCEL> buttons while holding down the <SHIFT> button.
This works as the cancelation function. (<EXIT>/<CANCEL> buttons)
Operations with the <SHIFT> button held down are displayed in orange at each operation section.
<AUDIO MON/ADV> button (Adjusting the audio)
<+>: When pressing during playback, the audio volume of the monitor is increased. When pressing during pause, frame-by-frame play is performed.
<−>: When pressing during playback, the audio volume of the monitor is decreased. When pressing during pause, frame-by-frame rewind is performed.
<BARS> button (Color bars)
Switch on/off the color bar. The color bar is interlocked with the test tone (1 kHz).
<LCD BACKLIGHT> button (Adjusting and setting the LCD monitor)
Select the brightness of the backlight of the LCD monitor.