- Top
- Web Screen
- [Setup] screen
- [Maintenance] screen
Check system logs, confirm software versions, or initialize the camera.
The screen consists of three tabs, [Product info.], [Default reset], and [Back up].
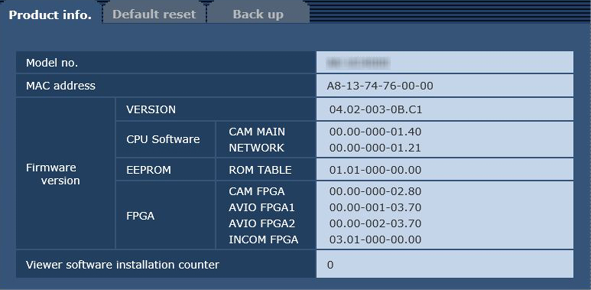
[Product info.] tab
Displays the software version of the camera.
Displays information of the camera such as [Model no.], [MAC address], and [Firmware version].
Item |
Description of settings |
[Model no.] |
Displays the model number of the camera. |
[MAC address] |
Displays the MAC address of the camera. |
[Firmware version] |
[CPU Software - CAM MAIN]: Displays the camera’s main software version. [CPU Software - NETWORK]: Displays the software version of the network component. [EEPROM - ROM TABLE]: Displays the version of the camera table. [FPGA - CAM FPGA]: Displays the camera’s FPGA version. [FPGA - AVIO FPGA1]: Displays the FPGA1 version of the image processing component. [FPGA - AVIO FPGA2]: Displays the FPGA2 version of the image processing component. [FPGA - INCOM FPGA]: Displays the FPGA version of the power supply and audio control component. |
[Viewer software installation counter] |
Displays the number of plugin software for display that has been installed automatically from the camera. |
[Default reset] tab
Initialize the setting data of the camera and restart the camera.

Item |
Description of settings |
[Reset to the default (Except the network settings)] |
By clicking the [Execute] button, resets the configuration of the camera to its default settings. The user name and password used for login are also reset to their default values (admin/12345). After executing the reset operation, the camera cannot be operated for approximately three minutes. The following setting items will not be reset.
|
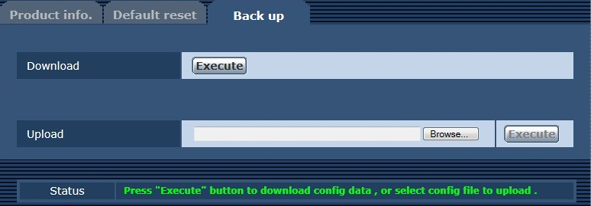
[Back up] tab
You can save network-related settings to a computer, or apply the settings saved in a computer to the camera.
Item |
Description of settings |
[Download] |
Saves the network-related settings of the camera to a computer. (Saving the network-related settings of the camera to a computer ([Download])) |
[Upload] |
Uploads the setting file of the camera saved in a computer using the download function. (Applying the settings saved in a computer to the camera ([Upload])) |
Perform the following procedure to save the network-related settings of the camera to a computer.
Do not turn off the power of the camera while the download operation is in process.
Do not perform any operation from the start of the download operation until its end.
- Click the [Execute] button for [Download].
A dialog box for saving destination appears.
- Specify a saving destination folder, and then click the [OK] button.
The data will be saved.
Perform the following procedure to upload the setting file of the camera saved in a computer using the download function [Download] to apply the settings to the camera.
Use the file downloaded with the camera when uploading data.
Do not change the extension (.ndt) of a downloaded file.
Do not turn off the power of the camera while the upload operation is in process.
Do not perform any operation from the start of the upload operation until its end.
- Click the [Browse...] button on [Upload] to specify the downloaded software.
- Click the [Execute] button.
A message dialog box appears.
- Click the [OK] button.
Uploading will start.
When uploading has finished, a message dialog box appears.
- Click the [OK] button.
The camera will be restarted automatically.