- Top
- Web Screen (AK-NP600)
- Displaying the web screen (AK-NP600)
- Network settings screen [Network]
Network settings screen [Network]
Make settings related to the network for AK-NP600 in the Network settings screen [Network].
The Network settings screen [Network] consists of [SFP+ primary], [SFP+ primary TX], [SFP+ primary RX], [SFP+ secondary], [SFP+ secondary TX], [SFP+ secondary RX], [1GbE], [Tally in setting], [PTP setting], [NMOS setting], and [Common].
SFP+ primary
Click [SFP+ primary] in the Network settings screen [Network].
Make network settings for the [SFP+1] slot (SFP+ primary) for MoIP input/output.
Confirm the settings with the [Set] button.
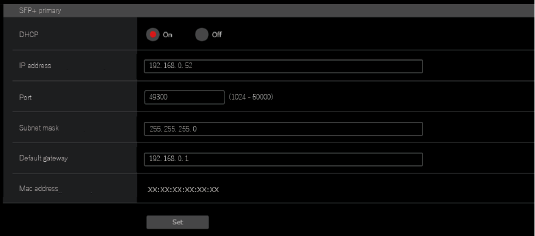
The following information is required to configure network settings. Consult your network administrator or Internet service provider.
-
IP address
-
Port
-
Subnet mask
-
Default gateway (when using a gateway server or router)
___ indicates factory default settings.
| Item |
Setting value |
Setting details |
|---|---|---|
DHCP |
ON |
Select the method for setting the SFP+ primary IP addresses. |
IP address |
192.168.0.50 |
When not using the DHCP function, enter the SFP+ primary IP addresses. |
Port |
49300 |
Enter the SFP+ primary port numbers. |
Subnet mask |
255.255.255.0 |
When not using the DHCP function, enter the SFP+ primary subnet masks. |
Default gateway |
192.168.0.1 |
When not using the DHCP function, set the SFP+ primary default gateways. |
Mac address |
Display only |
Display the SFP+ primary MAC addresses. |
SFP+ primary TX
Click [SFP+ primary TX] in the Network settings screen [Network].
Make network settings for the SFP+ primary TX signal.
Confirm the settings with the [Set] button.
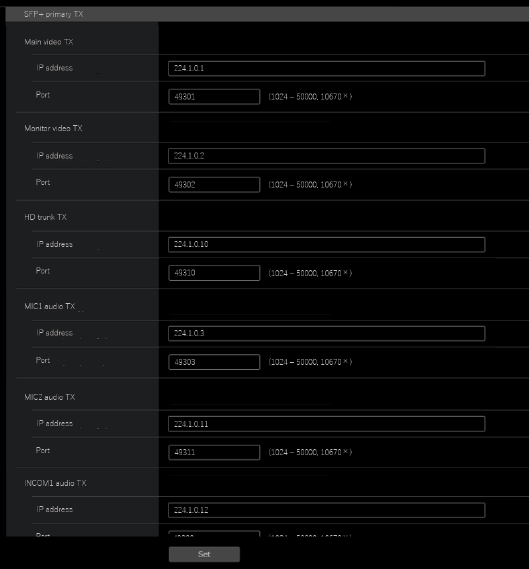
___ indicates factory default settings.
| Item |
Setting value |
Setting details |
|---|---|---|
Main video TX |
|
IP address Enter the IP address for Main video TX. Port Enter the port number for Main video TX. |
Monitor video TX |
|
IP address Enter the IP address for Monitor video TX. Port Enter the port number for Monitor video TX. |
HD trunk TX |
|
IP address Enter the IP address for HD trunk TX. Port Enter the port number for HD trunk TX. |
MIC1 audio TX |
|
IP address Enter the IP address for MIC1 audio TX. Port Enter the port number for MIC1 audio TX. |
MIC2 audio TX |
|
IP address Enter the IP address for MIC2 audio TX. Port Enter the port number for MIC2 audio TX. |
INCOM1 audio TX |
|
IP address Enter the IP address for INCOM1 audio TX. Port Enter the port number for INCOM1 audio TX. |
INCOM2 audio TX |
|
IP address Enter the IP address for INCOM2 audio TX. Port Enter the port number for INCOM2 audio TX. |
SFP+ primary RX
Click [SFP+ primary RX] in the Network settings screen [Network].
Make network settings for the SFP+ primary RX signal.
Confirm the settings with the [Set] button.
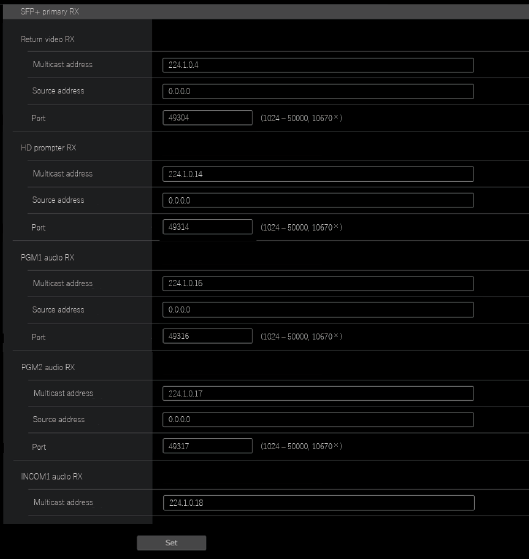
___ indicates factory default settings.
| Item |
Setting value |
Setting details |
|---|---|---|
Return video RX |
|
Multicast address Enter the multicast address for return images. Source address Enter the source IP address for return images. Port Enter the port number for return images. |
HD prompter RX |
|
Multicast address Enter the multicast address for HD PROMPTER RX. Source address Enter the source IP address for HD PROMPTER RX. Port Enter the port number for HD PROMPTER RX. |
PGM1 audio RX |
|
Multicast address Enter the multicast address for PGM1 audio RX. Source address Enter the source IP address for PGM1 audio RX. Port Enter the port number for PGM1 audio RX. |
PGM2 audio RX |
|
Multicast address Enter the multicast address for PGM2 audio RX. Source address Enter the source IP address for PGM2 audio RX. Port Enter the port number for PGM2 audio RX. |
INCOM1 audio RX |
|
Multicast address Enter the multicast address for INCOM1 audio RX. Source address Enter the source IP address for INCOM1 audio RX. Port Enter the port number for INCOM1 audio RX. |
INCOM2 audio RX |
|
Multicast address Enter the multicast address for INCOM2 audio RX. Source address Enter the source IP address for INCOM2 audio RX. Port Enter the port number for INCOM2 audio RX. |
SFP+ secondary
Click [SFP+ secondary] in the Network settings screen [Network].
Make network settings for the [SFP+2] slot (SFP+ secondary) for MoIP input/output.
Confirm the settings with the [Set] button.
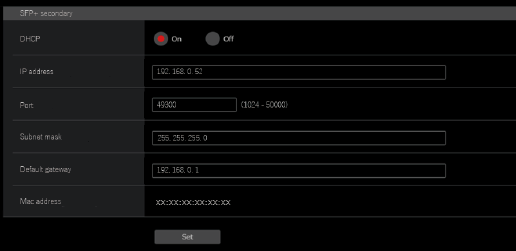
The following information is required to configure network settings. Consult your network administrator or Internet service provider.
-
IP address
-
Port
-
Subnet mask
-
Default gateway (when using a gateway server or router)
___ indicates factory default settings.
| Item |
Setting value |
Setting details |
|---|---|---|
DHCP |
ON |
Select the method for setting the SFP+ secondary IP addresses. |
IP address |
192.168.0.51 |
When not using the DHCP function, enter the SFP+ secondary IP addresses. Enter so that the address does not duplicate the IP addresses of the personal computer or other network cameras. |
Port |
49309 |
Enter the SFP+ secondary port numbers. |
Subnet mask |
255.255.255.0 |
When not using the DHCP function, enter the SFP+ secondary subnet masks. |
Default gateway |
192.168.0.1 |
When not using the DHCP function, set the SFP+ secondary default gateways. |
Mac address |
Display only |
Display the SFP+ secondary MAC addresses. |
SFP+ secondary TX
Click [SFP+ secondary TX] in the Network settings screen [Network].
Make network settings for the SFP+ secondary TX signal.
Confirm the settings with the [Set] button.
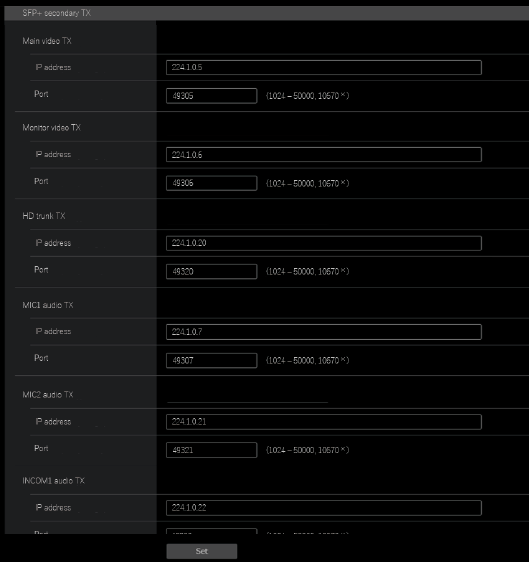
___ indicates factory default settings.
| Item |
Setting value |
Setting details |
|---|---|---|
Main video TX |
|
IP address Enter the IP address for Main video TX. Port Enter the port number for Main video TX. |
Monitor video TX |
|
IP address Enter the IP address for Monitor video TX. Port Enter the port number for Monitor video TX. |
HD trunk TX |
|
IP address Enter the IP address for HD trunk TX. Port Enter the port number for HD trunk TX. |
MIC1 audio TX |
|
IP address Enter the IP address for MIC1 audio TX. Port Enter the port number for MIC1 audio TX. |
MIC2 audio TX |
|
IP address Enter the IP address for MIC2 audio TX. Port Enter the port number for MIC2 audio TX. |
INCOM1 audio TX |
|
IP address Enter the source IP address for INCOM1 audio TX. Port Enter the port number for INCOM1 audio TX. |
INCOM2 audio TX |
|
IP address Enter the source IP address for INCOM2 audio TX. Port Enter the port number for INCOM2 audio TX. |
SFP+ secondary RX
Click [SFP+ secondary RX] in the Network settings screen [Network].
Make network settings for the SFP+ secondary RX signal.
Confirm the settings with the [Set] button.
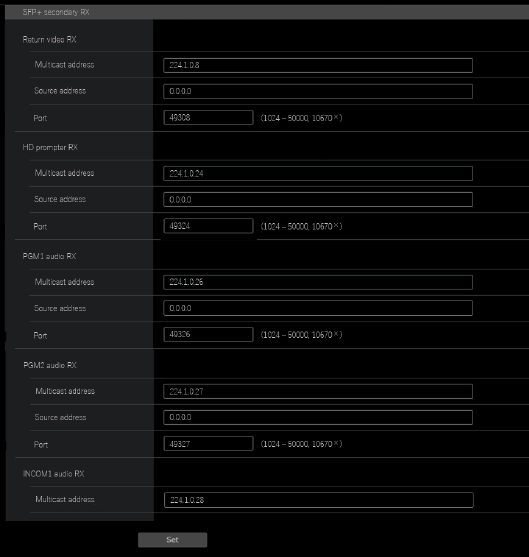
___ indicates factory default settings.
| Item |
Setting value |
Setting details |
|---|---|---|
Return video RX |
|
Multicast address Enter the multicast address for return images. Source address Enter the source IP address for return images. Port Enter the port number for return images. |
HD prompter RX |
|
Multicast address Enter the multicast address for HD PROMPTER RX. Source address Enter the source IP address for HD PROMPTER RX. Port Enter the port number for HD PROMPTER RX. |
PGM1 audio RX |
|
Multicast address Enter the multicast address for PGM1 audio RX. Source address Enter the source IP address for PGM1 audio RX. Port Enter the port number for PGM1 audio RX. |
PGM2 audio RX |
|
Multicast address Enter the multicast address for PGM2 audio RX. Source address Enter the source IP address for PGM2 audio RX. Port Enter the port number for PGM2 audio RX. |
INCOM1 audio RX |
|
Multicast address Enter the multicast address for INCOM1 audio RX. Source address Enter the source IP address for INCOM1 audio RX. Port Enter the port number for INCOM1 audio RX. |
INCOM2 audio RX |
|
Multicast address Enter the multicast address for INCOM2 audio RX. Source address Enter the source IP address for INCOM2 audio RX. Port Enter the port number for INCOM2 audio RX. |
1GbE
Click [1GbE] in the Network settings screen [Network].
Make network settings for the 1GbE (LAN2) for AK-NP600.
Confirm the settings with the [Set] button.
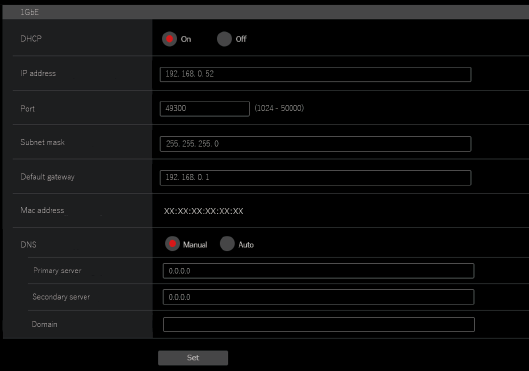
The following information is required to configure network settings. Consult your network administrator or Internet service provider.
-
IP address
-
Port
-
Subnet mask
-
Default gateway (when using a gateway server or router)
-
Primary server address, secondary server address, and domain for DNS (when using DNS)
___ indicates factory default settings.
| Item |
Setting value |
Setting details |
|---|---|---|
DHCP |
ON |
Select the method for setting the 1GbE (LAN2) IP addresses. |
IP address |
192.168.0.52 |
When not using the DHCP function, enter the 1GbE (LAN2) IP addresses. Enter so that the address does not duplicate the IP addresses of the personal computer or other network cameras. |
Port |
49330 |
Enter the 1GbE (LAN2) port numbers. |
Subnet mask |
255.255.255.0 |
When not using the DHCP function, enter the 1GbE (LAN2) subnet masks. |
Default gateway |
192.168.0.1 |
When not using the DHCP function, set the 1GbE (LAN2) default gateways. |
Mac address |
Display only |
Display the 1GbE (LAN2) MAC addresses. |
DNS |
|
DNS Sets whether the DNS server address is to be acquired automatically (AUTO), or to be input manually (MANUAL). Primary server address Secondary server address Domain When using [MANUAL] for [DNS], enter the IP address for the DNS server.
|
Tally in setting
Click [Tally in setting] in the Network settings screen [Network].
Make settings related to Tally control via TSL Protocol 5.0.
Confirm the settings with the [Set] button.

___ indicates factory default settings.
| Item |
Setting value |
Setting details |
|---|---|---|
Index no. |
1 |
Enter the Index no. set by devices that output Tally. |
Port |
62000 |
Enter the Tally in port number. |
PTP setting
Click [PTP setting] in the Network settings screen [Network].
Make PTP related network settings.
Confirm the settings with the [Set] button.

___ indicates factory default settings.
| Item |
Setting value |
Setting details |
|---|---|---|
Domain |
127 |
Sets the DOMAIN number. |
IP address |
Display only |
Displays the IP address automatically discovered. |
NMOS setting
Click [NMOS setting] in the Network settings screen [Network].
Make NMOS related network settings.
Confirm the settings with the [Set] button.
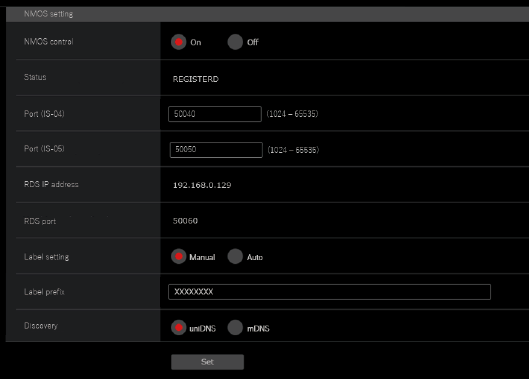
___ indicates factory default settings.
| Item |
Setting value |
Setting details |
|---|---|---|
NMOS control |
ON |
Enables/disables the NMOS function. |
Status |
UNREGISTERD |
Displays the NMOS operation status, such as RDS connection status. |
Port(IS-04) |
50040 |
Sets the port number on the camera for IS-04 Node API. |
Port(IS-05) |
50050 |
Sets the port number on the camera for IS-05 Node API. |
RDS IP address |
Display only |
Displays the discovered IP address. |
RDS port |
Display only |
Displays the port number automatically discovered. |
Label setting |
AUTO |
AUTO The Label prefix cannot be changed. MANUAL Text can be set in Label prefix. |
Index no. |
UCU600_**** |
Sets the prefix appended which is shared with NMOS resource names on this unit. |
Port |
uniDNS |
Sets the method for NMOS resource discovery. |
Common
Click [Common] in the Network settings screen [Network].
Make AK-NP600 shared network settings.
Confirm the settings with the [Set] button.
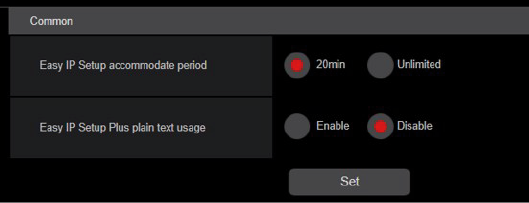
___ indicates factory default settings.
| Item |
Setting value |
Setting details |
|---|---|---|
EasyIP Setup accommodate period |
20min. |
Sets the time allowed for network setting operations from EasyIP Setup Tool Plus. 20min. Allows camera setting operations on the EasyIP Setup Tool Plus for just 20 minutes after start up of this unit. Unlimited Allows camera setting operations on the EasyIP Setup Tool Plus at any time.
|
EasyIP Setup Plus plain text usage |
Enable |
Sets whether to enable or disable encryption of communications when communicating with EasyIP Setup Tool Plus. Enable. Communications are sent and received as plain messages. Disable Communications are sent and received as encrypted messages. |