- Top
- Description of parts
- Shooting and recording/playback functions section
- Shooting and recording (camera unit)
Shooting and recording (camera unit)
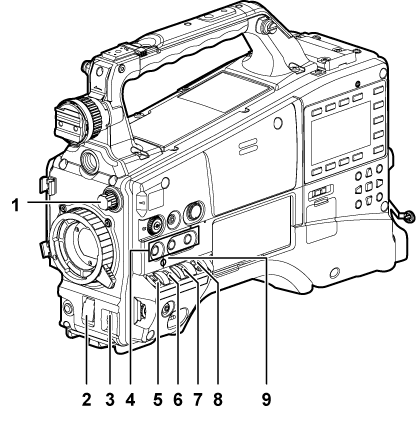
<ND FILTER> dial (White/black balance adjustment to completion of recording)
Select the filter to suit the brightness of the subject.
<1><CLEAR>: Does not use the ND filter.
<2><1/4ND>: Reduce the amount of light entering the MOS sensor to 1/4.
<3><1/16ND>: Reduce the amount of light entering the MOS sensor to 1/16.
<4><1/64ND>: Reduce the amount of light entering the MOS sensor to 1/64.
<SHUTTER> switch (Setting the electronic shutter)
This is the electronic shutter switch.
<OFF>: Disables the electronic shutter.
<ON>: Enables the electronic shutter.
<SEL>: Changes the speed of the electronic shutter.
This switch is the spring switch. Each turn towards the <SEL> side alters the shutter speed.
<AUTO W/B BAL> switch (Adjusting the white balance)
<AWB>: Adjusts white balance automatically. When this switch is operated with the <WHITE BAL> switch on the side set to the <A> or <B> position, white balance is adjusted in several seconds and the adjusted value is stored in memory. When the <WHITE BAL> switch is at the <PRST> position, the value can be changed to the preset color temperature and user-specified variable value by setting the <AUTO W/B BAL> switch towards the <AWB> side, and setting it once again towards the <AWB> side while the color temperature is displayed.
<ABB>: Adjusts black balance automatically.
USER (<USER MAIN>/<USER1>/<USER2> button) (Assigning functions to USER buttons)
Assign user-selected functions to each button. Pressing each button performs the assigned function.
<DISP/MODE CHK> switch (Checking and displaying the shooting status)
This is the spring switch to check the status of the shooting, etc.
Push this towards the <OFF> side to clear all displays except viewfinder operation status and frame displays such as the area display, and the counter, marker, and safety zone displays.
Push this towards the <CHK> side to display in the viewfinder the setting status for all shooting functions, the list of functions assigned to the USER button, etc. while on stand-by or while shooting. Pushing it to the <CHK> side again while information is displayed switches the display to the next information page. The mode check information display disappears after approximately three seconds.
<GAIN> switch (Adjusting the white balance)
Switch the video amplifier gain according to the brightness of the subject to shoot.
The gain settings for the <L>/<M>/<H> positions can be changed using main menu → [SW MODE] → [LOW GAIN], [MID GAIN], and [HIGH GAIN].
Factory settings are L=0 dB, M=6 dB, and H=12 dB.
<OUTPUT>/<AUTO KNEE> selector switch
Select the video signals output to the memory, viewfinder and video monitor from the camera unit.
<CAM>/<ON>: Video captured with the camera is output and the auto knee function is activated. Instead of the auto knee function, the dynamic range stretcher (DRS) function can be assigned.
<CAM>/<OFF>: Video captured with the camera is output and the auto knee function is not activated. The knee point is fixed to the level set by menu operations.
<BARS>/<OFF>: Color bars signal is output. The auto knee function is not activated.
<WHITE BAL> switch (Adjusting the white balance, Adjusting the black balance)
Select the method for adjustment of the white balance.
<PRST>: Set the switch to this position when you have no time or are otherwise unable to adjust the white balance.
The factory setting is 3200 K.
The color temperature can be changed successively to 3200 K, 5600 K, and the user-specified variable value by setting the main menu → [SW MODE] → [W.BAL PRESET], or by pushing the <AUTO W/B BAL> switch towards the <AWB> side, and pushing the <AUTO W/B BAL> switch towards the <AWB> side again while the color temperature is displayed. The variable value can be set with the jog dial button. (When you have no time to adjust the white balance)
<A>/<B>: Pushing the <AUTO W/B BAL> switch towards the <AWB> side adjusts the white balance automatically and saves the adjusted value to <A> or <B>.
Selecting [Bch] from the main menu → [SW MODE] → [ATW] allows you to assign auto tracking white balance (ATW) function to <B>. (Setting the auto tracking white balance (ATW) function)
Focal plane index <
 >
>Indicate the imaging plane inside the camera.