- Top
- SmartUI operation
- SmartUI basic operations
- Buttons used with SmartUI
Buttons used with SmartUI
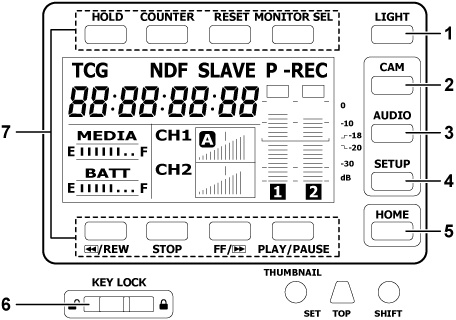
When the camera is turned on, the [HOME] screen is displayed. The status of the [HOME] screen at previous start-up is retained.
<LIGHT> button
Switches the SmartUI backlight on and off. This can be operated regardless of the status of the <KEY LOCK> switch.
<CAM> button
Displays a settings screen related to the camera image ([CAMERA] screen).
Each time you press the button, the settings screens change in order.
<AUDIO> button
Displays a settings screen related to audio ([AUDIO] screen).
Each time you press the button, the settings screens change in order.
<SETUP> button
Displays a settings screen related to time code and image output ([SETUP] screen).
Each time you press the button, the settings screens change in order.
<HOME> button
While another screen is displayed, press this button to return to the [HOME] screen.
While the [HOME] screen is displayed, press this button to change the status information display at the bottom of the screen.
<KEY LOCK> switch
Slide to the right to lock the operations of all buttons of SmartUI. Slide to the left to unlock.
Buttons for thumbnail operations will be locked as well.
<HOLD> button, <COUNTER> button, <RESET> button, <MONITOR SEL> button, <
 /REW> button, <STOP> button, <FF/
 > button, and <PLAY/PAUSE> button
When the [HOME] screen is displayed
The function printed above or below each button is performed.
When the [CAMERA] screen, the [AUDIO] screen, or the [SETUP] screen is displayed
Instead of the printed functions, the functions in the [ ] of SmartUI are assigned to upper or lower buttons corresponding to each setting screen. For details, refer to “SmartUI menu list”.