Preparation

Power supply setup to P2 card insertion

co_body_powersupply_P2card

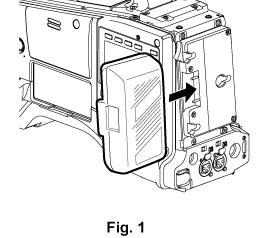
Insert a charged battery pack. (Fig. 1)

Turn the <POWER> switch <ON>, and check the battery charge level.

Check the battery charge level indication on the viewfinder or the [HOME] screen of SmartUI.

If the battery charge level shows lower than actual, check the battery settings. ([BATTERY SETUP]) If the settings are correct, replace with a fully charged battery.

Insert the P2 card. (Inserting a P2 card)

Shooting and recording switch settings

After turning on the power and inserting the P2 card, set the switches as follows before starting operations.

body_switch_settings
  1. <USER MAIN> button

    The [Y GET] function is assigned in the factory settings.

  2. <GAIN> switch

    Normally, set this to <L> (0 dB). If conditions are too dark, set the gain to an appropriate value.

  3. <OUTPUT>/<AUTO KNEE> selector switch

    Set this switch to <CAM>/<ON>.

  4. SmartUI

    1. On the [SET01:TC/UB] screen, set [TC_MD] to [F-RUN] or [R-RUN].

    2. On the [AUD02:INPUT] screen, set [LVL] to [AUTO].