Set the camera for adjustment.
Mount the lens on the camera.
Set the <SHUTTER> switch to <OFF>, and the <GAIN> switch to <L> (0 dB).
If the lens is equipped with an extender function, release the extender function.
Make sure it is set to either [L1:LENS1], [L2:LENS2], or [L3:LENS3] using main menu → [MAINTENANCE] → [WHITE SHADING] → [SHADING SELECT].
Select [EXECUTE] using main menu → [MAINTENANCE] → [WHITE SHADING].
Set the screen.
Shoot a white sheet of paper with no unevenness of color for the whole screen.
Set the lens aperture to manual, and adjust it so that the zebra pattern covers the whole viewfinder screen.
Make sure that the lens aperture control is between F4 to F11.
Adjust the position of the lighting because the zebra pattern will not cover the whole screen if there is any unevenness in the lighting.
Make adjustments to avoid several light sources of different color temperature (e.g. fluorescent lights and halogen lamp) from illuminating on the white paper.
Adjust the white balance/black balance.
Set the <WHITE BAL> switch to <A> or <B>, and use the <AUTO W/B BAL> switch to adjust white balance automatically (AWB).
Use the <AUTO W/B BAL> switch to adjust black balance automatically (ABB).
Use the <AUTO W/B BAL> switch to adjust white balance automatically (AWB) again.
Adjust white shading.
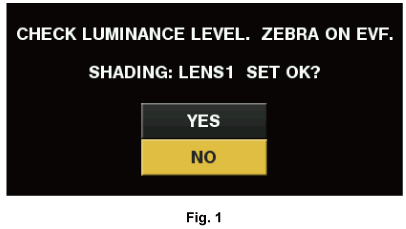
Select [YES] and press the jog dial button.
The [ACTIVE...] message is displayed on the screen during the adjustment.
When the adjustment is complete after a few seconds, the [WHITE SHADING OK!] message is displayed.
If an error message such as [WHITE SHADING ERROR!], [LEVEL OVER], [WHITE SHADING ERROR!], or [LOW LIGHT] appears, readjust the iris.
The adjusted value is automatically stored in the selected memory ([L1:LENS1], [L2:LENS2], or [L3:LENS3]).
If the lens is equipped with an extender function, enable the extender function and repeat steps 2 to 5.
Adjusted values are stored on the camera as a single lens correction data including two ways for when the lens is equipped and not equipped with a lens extender.
Adjustment values are saved in memory, so there is no need to re-adjust white shading even after turning the camera off.