- Top
- Web Screen
- [Setup] screen
- [User mng.] screen
[User mng.] screen
The users and personal computers (IP addresses) that can access the unit from personal computers are registered in the [User mng.] screen.
The [User mng.] screen consists of [User auth.] tab and [Host auth.] tab.
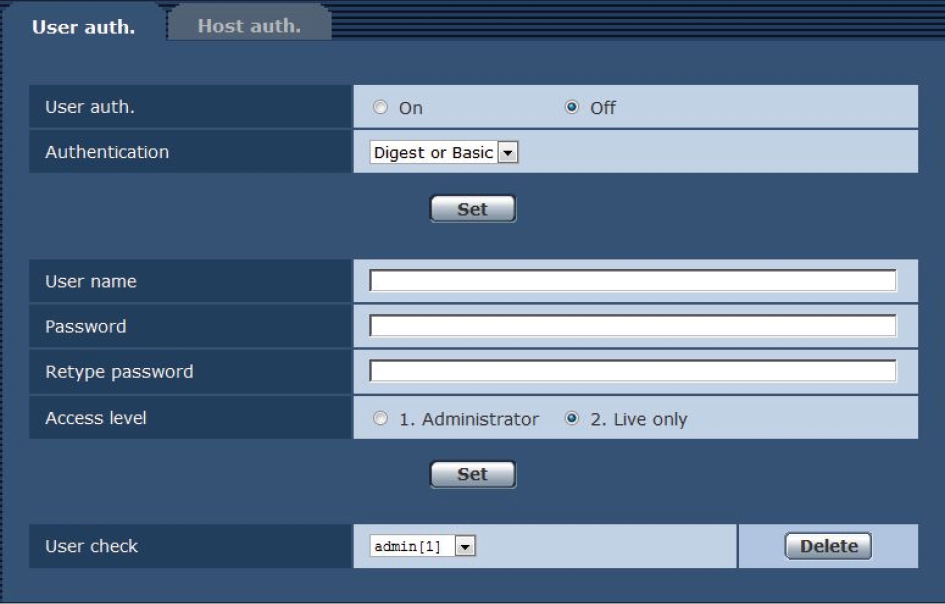
[User auth.] tab
Click the [User auth.] tab of [User mng.] screen.
Configure the user authorization settings for the personal computers that can access the unit.
Up to 18 users can be registered.
___ indicates factory default settings.
|
Item |
Setting value |
Setting details |
|---|---|---|
|
On Off |
Set whether to perform user authorization. On Perform user authentication. Off Do not perform user authentication. |
|
|
Authentication |
Digest or Basic Digest Basic |
Specify the method of user authentication to use. The authorization configured here is used for authentication when accessing the web screen. Digest authentication will always be used for connection with the controller. Digest or Basic Use digest authentication or basic authentication. Digest Use digest authentication. Basic Use basic authentication.
|
|
User name |
Enter the user name.
1 to 32 half-size characters
Full-size and half-size " : ; & \ symbols
|
|
|
Password Retype password |
Enter the password.
4 to 32 half-size characters
Full-size and half-size " & |
|
|
1. Administrator 2. Live only |
Select one of the following settings as the user access level.
This access level allows the user to perform all the unit’s operations.
This access level enables only [Live] screen to be displayed. The unit cannot be operated or set. |
|
|
User check |
You can view registered users by clicking [ A registered user is indicated in the form of “Registered user name [Access level].” (Example: admin[1]) You can delete selected users by clicking the [Delete] button at the right. |
 ] for [User check].
[Host auth.] tab
Click the [Host auth.] tab of [User mng.] screen.
Configure the host authorization settings that restrict the personal computers (IP addresses) that can access the unit.
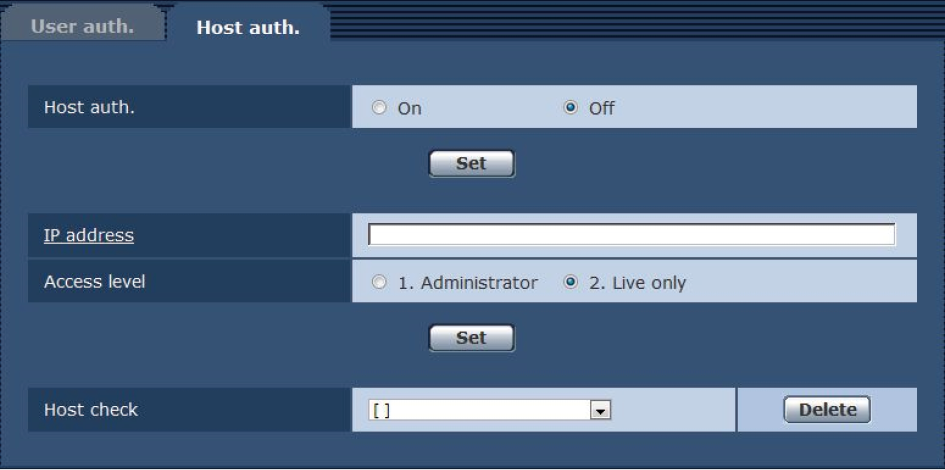
___ indicates factory default settings.
|
Item |
Setting value |
Setting details |
|---|---|---|
|
Host auth. |
On Off |
Set whether to perform host authorization. On Perform host authentication. Off Do not perform host authentication. |
|
IP address |
The IP address of the personal computer from which access to the unit is allowed is input here. The host name cannot be input as the IP address.
|
|
|
Access level |
1. Administrator 2. Live only |
Set the host access level. 1. Administrator This access level allows the user to perform all the unit’s operations. 2. Live only This access level enables only [Live] screen to be displayed. The unit cannot be operated or set. |
|
Host check |
You can view registered host IP addresses by clicking [ A host is indicated in the form of “Registered IP address [Access level].” (Example: 192.168.0.21 [1]) You can delete selected hosts (IP addresses) by clicking the [Delete] button at the right. |
 ] for [Host check].