- Top
- Web Screen
- [Setup] screen
- [Maintenance] screen
[Maintenance] screen
Among the various maintenance operations performed on this screen are system log checks, software version check and initialization of the unit.
The Maintenance screen consists of three tabs: [Product info.], [Default reset] and [Back up].
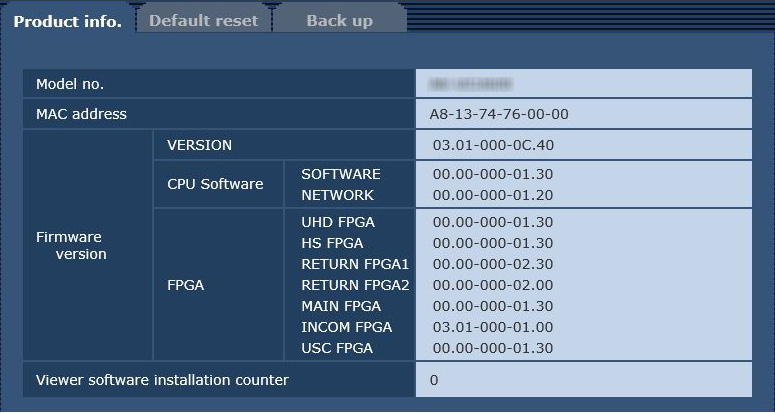
[Product info.] tab
The versions of the unit's software can be checked on this screen.
The [Model no.], [MAC address], [Firmware version] and other information about the unit is displayed.
|
Item |
Display description |
|---|---|
|
Model no. |
Display the unit's model number. |
|
MAC address |
Display the unit's MAC address. |
|
Firmware version |
CPU Software - SOFTWARE Display the software version of this unit. CPU Software - NETWORK Display the software version of the network. FPGA - UHD FPGA Display the image processing (4K) FPGA version. FPGA - HS FPGA Display the image processing (HS) FPGA version. FPGA - RETURN FPGA1 Display the return image processing FPGA1 version. FPGA - RETURN FPGA2 Display the return image processing FPGA2 version. FPGA - MAIN FPGA Display the FPGA version of this unit. FPGA - INCOM FPGA Display the power and audio management FPGA version. FPGA - USC FPGA Display the UHD output conversion FPGA version. |
|
Viewer software installation counter |
The number of plug-in viewer software applications which have been installed automatically from the unit is displayed by this counter. |
[Default reset] tab
The unit's setting data or HTML is initialized and the unit is restarted on this screen.

|
Item |
Setting details |
|---|---|
|
Reset to the default (Except the network settings) |
When the [Execute] button is clicked, the unit's settings are returned to their defaults.
|
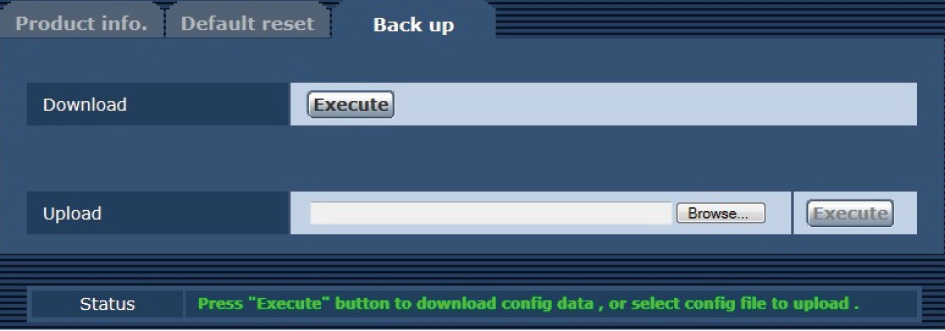
[Back up] tab
On this screen, the unit's network settings can be saved to a personal computer or settings stored on a personal computer can be applied on the unit.
|
Item |
Setting details |
|---|---|
|
Download |
Save the unit's network settings to a personal computer.
|
|
Upload |
Upload a unit configuration file that was saved to a personal computer with the download function.
|


Saving the unit's network settings to a personal computer [Download]
Follow the procedure below to save the unit's network settings to a personal computer.
- Do not turn off the unit's power during downloading.
- Do not attempt to perform any operations during downloading. Wait until downloading is completed.
1.Click the [Execute] button of [Download].
The save destination dialog box appears.
2.Specify the save destination folder and then click the [OK] button.
The data is saved.
Applying settings stored on a personal computer to the unit [Upload]
Follow the procedure below to upload a unit configuration file that was saved to a personal computer with the download function [Download] and then apply the settings on the unit.
- For the data to use for uploading, use a file downloaded with the unit.
Furthermore, do not change the extension (.ndt) of the downloaded file.
- Do not turn off the unit's power during uploading.
- Do not attempt to perform any operations during uploading. Wait until uploading is completed.
1.Click the [Browse] button of [Upload], and specify the downloaded software.
2.Click the [Execute] button.
A message dialog box appears.
3.Click the [OK] button.
Uploading begins.
A message dialog box appears when uploading completes.
4.Click the [OK] button.
The unit restarts automatically.