Adjusting the white shading
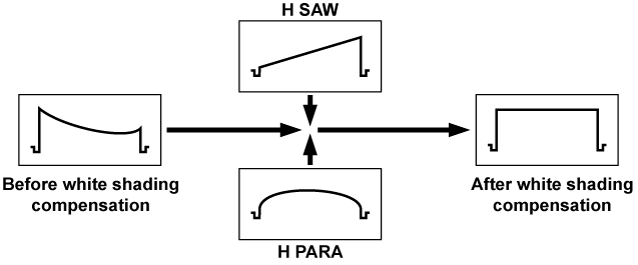
This is a method of combining the sawtooth shaped waveform and parabola waveform to compensate to a flatter waveform based on the respective R, G and B waveforms of the video signal.
We recommend adjusting the R, G and B waveforms in the horizontal and vertical directions while monitoring them on the waveform monitor.
Make sure to adjust the white shading after disabling the variable frame rate.
Set the camera for adjustment.
Mount the lens on the camera.
Make sure to connect the lens cable.
Switch the shutter OFF and set the EXPOSURE INDEX to 0 dB or ISO2500.
If the lens is equipped with an extender function, release the extender function.
Confirm that [MENU] → [SYSTEM SETTINGS] → [COLOR SETTING] → [MAIN] is set to [HD]. Also, confirm that [ZEBRA1 DETECT] is set to [70%], [ZEBRA2 DETECT] is set to [85%], and [ZEBRA2 MODE] is set to [SPOT] in [MENU] → [OUTPUT SETTINGS] → [VF EI ASSIST] → [ZEBRA], and close the menu screen.
Change the settings if they are different.
Select [ON] in [MENU] → [OUTPUT SETTINGS] → [VF EI ASSIST] → [ZEBRA] → [ZEBRA MASTER SW].
Set the screen.
Shoot a white sheet of paper with no unevenness of color for the whole screen.
Set the lens aperture to manual, and adjust it so that the zebra pattern covers the whole viewfinder screen.
Make sure that the lens aperture control is between F4 and F11.
Adjust the position of the lighting because the zebra pattern will not cover the whole screen if there is any unevenness in the lighting.
Make adjustments to avoid several light sources of different color temperature (e.g. fluorescent lights and halogen lamp) from illuminating on the white paper.
Adjust the white balance/black balance.
Make sure that white balance is set to [PRESET].
When checking from the control panel
Select [WB] → [PRESET] from the HOME screen.
When checking from the menu
From [MENU] → [CAMERA SETTINGS] → [WHITE] → [MODE], select [PRESET].
Execute white balancing.
When executing from the control panel
Select [WB] → [AWB] from the HOME screen.
When executing from the menu
From [MENU] → [CAMERA SETTINGS] → [WHITE] → [AWB], select [EXECUTE].
Execute black balancing.
From [MENU] → [CAMERA SETTINGS] → [BLACK] → [ABB], select [EXECUTE].
Perform the operation in Step 2 and execute white balancing again.
Adjust white shading.
From [MENU] → [CAMERA SETTINGS] → [WHITE SHADING], adjust [H.SAW] through [V.PARA] to create a flatter waveform.
If the lens is equipped with an extender function, turn on the extender function and repeat steps 2 to 5.
Compensation values are stored on the camera as a single lens file data using two patterns for when the lens is equipped and not equipped with an extender pattern.
Adjustment values are saved in memory, so there is no need to re-adjust white shading even after turning the camera off.