- Top
- Description of Parts
- Camera
- Right side
Right side
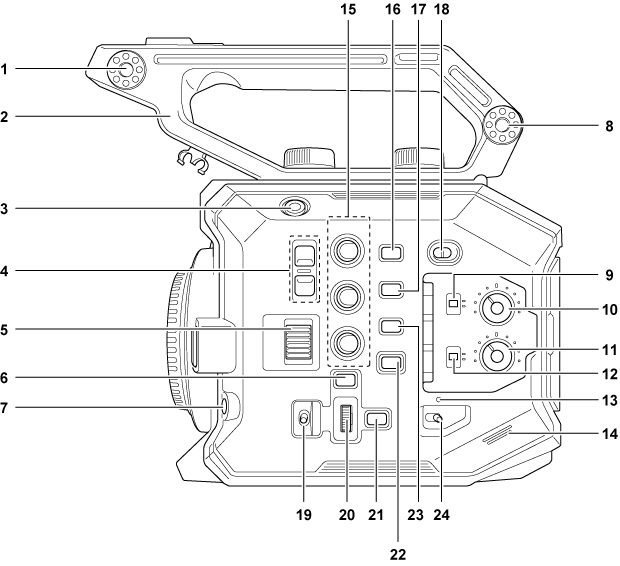
LCD monitor unit mounting section
Mounts the included LCD monitor mounting attachment.
Handle
This is a removable handle.
Already mounted to the camera.
REC button
Starts or stops the recording.
<ND FILTER> button
Switches the ND filter by pressing the <+> button or the <−> button.
The set value can be checked in the ND filter display of the VIEW screen. Displayed contents of the ND filter display are as follows.
[ND:1.8]: Reduces the amount of light entering the MOS sensor to 1/64.
[ND:1.2]: Reduces the amount of light entering the MOS sensor to 1/16.
[ND:0.6]: Reduces the amount of light entering the MOS sensor to 1/4.
[ND:CLR]: The ND filter is not used.
<IRIS> dial
Controls the iris of the EF lens.
Turn upward: Controls toward closing.
Turn downward: Controls toward opening.
Press: Switches between <AUTO>/<MANU>.
<MENU> button
Displays the menu. Pressing the <MENU> button while the menu is displayed closes the menu.
<AWB>/<USER 6> button
Adjusts the white balance.
Also, this is also used as the USER button (USER6).
Accessory mounting section
The included LCD monitor mounting attachment can also be mounted.
<CH1> switch
Selects the method to adjust the audio input level for the <AUDIO INPUT 1> terminal.
<AUTO>: Adjusts automatically.
<MANU>: Adjusts with the <AUDIO LEVEL CH1> knob.
<AUDIO LEVEL CH1> knob
Adjusts the audio input level when the <CH1> switch is set to <MANU>.
<AUDIO LEVEL CH2> knob
Adjusts the audio input level when the <CH2> switch is set to <MANU>.
<CH2> switch
Selects the method to adjust the audio input level for the <AUDIO INPUT 2> terminal.
<AUTO>: Adjusts automatically.
<MANU>: Adjusts with the <AUDIO LEVEL CH2> knob.
Power lamp
Indicates the status of power. Illuminates in red when the power is on.
To flash the lamp or not can be set in the menu.
Built-in speaker
Outputs audio during playback.
Audio is not output from the built-in speaker when headphones are connected to the headphone terminal.
USER buttons (<USER 1>, <USER 2>/<VIEW>, <USER 3>/<INFO>)
A function selected by the user can be assigned to each button. Pressing the button while the VIEW screen is displayed will perform the assigned function.
Pressing the button while displaying the HOME screen will perform the operation of the <VIEW>/<INFO> button displayed in orange in the camera. Pressing the <VIEW> button will display the VIEW screen, and pressing the <INFO> button will display the INFO screen.
<E.I.S.>/<USER 4> button
Enables/disables the electronic image stabilization function.
Also, this is also used as the USER button (USER4).
<WFM>/<USER 5> button
Displays/hides the waveform monitor displayed on the LCD monitor.
Also, this is also used as the USER button (USER5).
<LOCK> switch
Sliding toward the <
 > side disables the operations other than the power switch.
Sets the button and switch to disable the operation in the [SYSTEM SETTINGS] menu → [SIDE LOCK].
<WB>/<USER>/<ISO/dB> switch
Use by switching between <WB> (white balance)/<USER> (USER button)/<ISO/dB> (gain adjustment) functions.
The selected function is operated with the multidial.
Multidial
Moves, selects, and sets the menu while the menu is displayed.
Also, operates the selected function with the <WB>/<USER>/<ISO/dB> switch.
<EXIT> button
Returns to one level higher when the menu is displayed. Pressing the <EXIT> button without confirming the setting value will not reflect the change in the setting.
<HOME> button
Displays the HOME screen on the LCD monitor.
<THUMBNAIL> button
Displays the thumbnail screen on the LCD monitor.
Pressing the <THUMBNAIL> button again displays the VIEW screen.
Power switch
Switches between power on/standby.
To turn on, set the power switch to <
 > (ON). To set to standby, set the power switch to <
  > (standby).