Connecting to external devices using the <USB3.0> terminal (host) (USB storage mode)

You can use an HDD or SSD that can be connected via USB 2.0/USB 3.0. However, there are certain storage devices that cannot be used depending on the device.

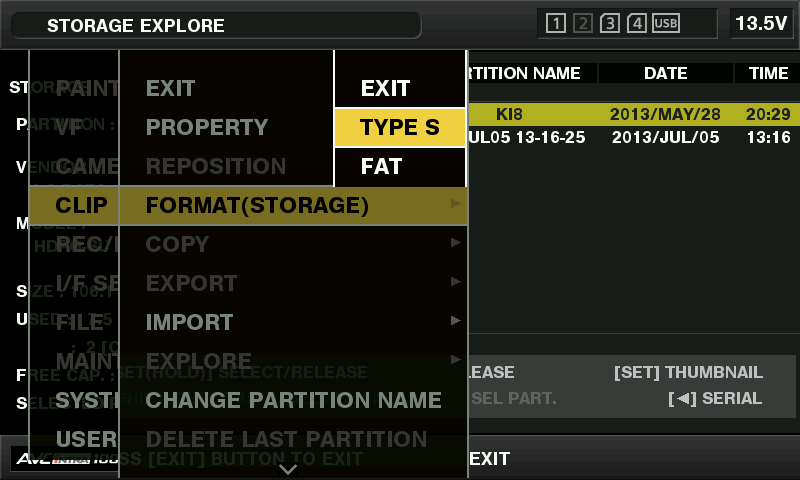
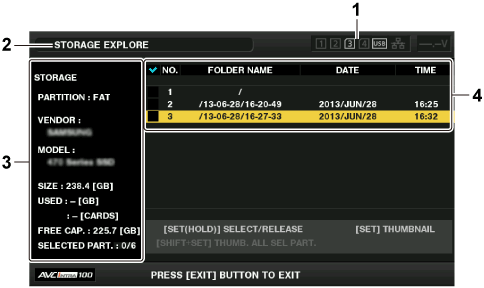
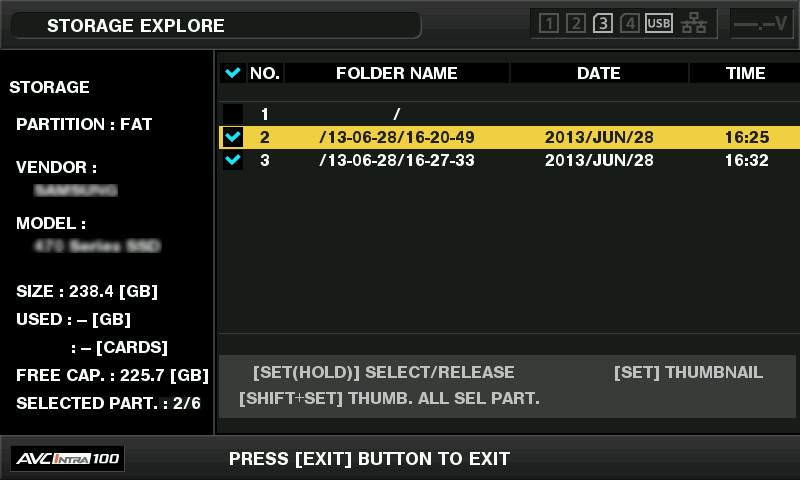
Storage device types and available functions

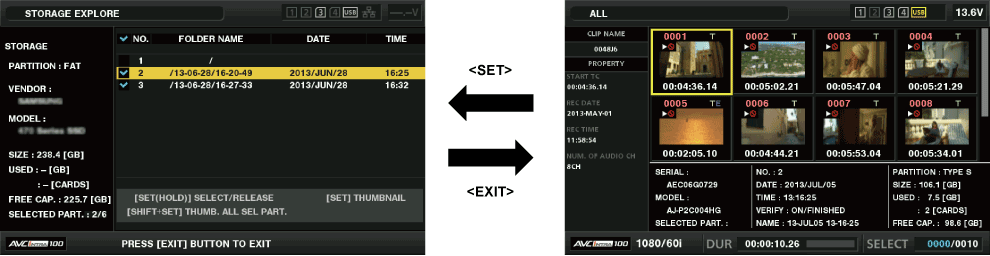
The available functions differ depending on the storage device you will use. The storage device type is displayed after [PARTITION] on the left side of the storage device explorer screen.

For details, refer to “Storage device information display (explorer screen)”.

P2 memory card, or microP2 memory card with 32 GB or lower capacity

microP2 memory cards that exceed 32 GB

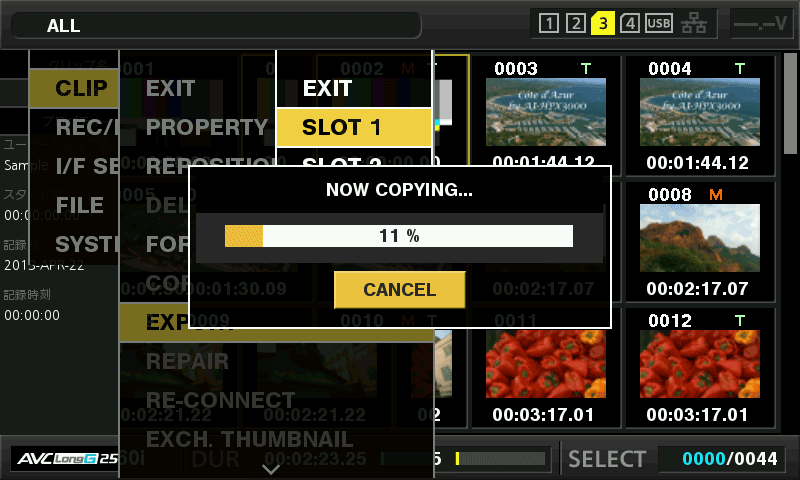
Playback from the storage device is unavailable on the camera. Import the contents to the P2 card before playing back.

If you perform additional clip writing, you will not be able to write back to that partition by card.

Storage devices with a capacity of 2 TB or more cannot be formatted.

Connecting a storage device

Switch the camera to USB storage mode.

For details, refer to “Switching to the USB storage mode”.

Connect the storage device to the <USB3.0> terminal.

  • When connecting a storage device which supports USB 3.0, use a cable that conforms to the USB 3.0 standard.

  • You will not be able to achieve transfer rates faster than USB 2.0 rates using a USB 2.0 cable.

  • If the storage device is recognized and is usable, imageicon_usb_dark (gray) on the top right of the thumbnail screen changes to imageicon_usb_white (white).

Formatting a storage device

You can initialize the storage device to a usable format using the [TYPE S] or the [FAT] file system.

osd_storage_format

Select [STORAGE] in the main menu → [CLIP] → [EXPLORE] and press the <SET> button.

This opens the explorer screen.

Select desired format ([TYPE S], [FAT]) in the main menu → [CLIP] → [FORMAT(STORAGE)] and press the <SET> button.

Select [YES] in the confirmation message and press the <SET> button.

Select [YES] again when the confirmation message appears and press the <SET> button.

This formats the storage device.

Exporting to a storage device by card

You can export to a storage device (write to a storage device from a P2 card) by P2 card. The copy results and the maximum number of items that can be copied vary depending on format type of the storage device. You cannot perform copying once the capacity of the storage device is exceeded.

osd_storage_export

Copying to a storage device by clip

You can copy only the selected clips to a storage device.

Go to the thumbnail screen. Use the cursor buttons to place the cursor on a clip you want to copy and press the <SET> button.

You can also select multiple clips.

Select [STORAGE] in the main menu → [CLIP] → [COPY] and press the <SET> button.

A list of folders or partitions in the storage device is displayed.

Select the copy destination and press the <SET> button.

Select [YES] in the confirmation message and press the <SET> button.

This starts the copying process. A progress bar is displayed during copying.

[COPY COMPLETED!] will be displayed when copying is completed.

Storage device information display (explorer screen)

You can select the following in the explorer screen display.

  • Storage device information display

  • Storage device partition or folder thumbnail display selection

  • Target partition or folder selection

To display the explorer screen, select [STORAGE] in the main menu → [CLIP] → [EXPLORE] and press the <SET> button.

osd_storage_explorer_ex
  1. Storage device indicator

    This displays the connected / not connected status and the storage device type.

  2. Display mode

    This indicates that the explorer screen of the storage device is currently displayed.

  3. Device information

    For [TYPE S] and [P2STORE] (storage devices that allow reading/writing by card)

    [PARTITION]

    [TYPE S]/[P2STORE]

    [VENDOR]

    Vendor name

    [MODEL]

    Model name

    [SIZE]

    Total capacity (unit: GB)

    [USED]

    Used capacity (unit: GB)

    Used P2 card area (unit: number of clips), maximum of 23

    [FREE CAP.]

    Remaining capacity (unit: GB)

    [SELECTED PART.]

    Number of partitions selected

    For [FAT] and [OTHER] (other storage devices)

    [PARTITION]

    [FAT]/[OTHER]

    [VENDOR]

    Vendor name

    [MODEL]

    Model name

    [SIZE]

    Total capacity (unit: GB)

    [FREE CAP.]

    Remaining capacity (unit: GB)

    [SELECTED PART.]

    Number of folders selected

  4. Partition or folder information

    For [TYPE S] and [P2STORE] (partition information)

    indicator_select

    Displays a checkmark when a target partition is selected

    [NO.]

    Partition number

    [MODEL]

    P2 card model name

    [PARTITION NAME]

    Name assigned to the partition

    [DATE]

    Partition record date

    [TIME]

    Partition record time

    [SERIAL]

    P2 card serial number

    For [FAT] and [OTHER] (folder information)

    indicator_select

    Displays a checkmark when a target partition is selected

    [NO.]

    Folder number

    [FOLDER NAME]

    Folder name (excluding the CONTENTS folder)

    [DATE]

    Folder creation date

    [TIME]

    Folder creation time

Selecting the target folder/partition in the explorer screen

You can display all clips included in the selected partition/folder as thumbnails by selecting partitions/folders as targets. You can display up to six partitions/folders. When the seventh partition/folder is specified, setting is disabled and a warning is displayed.

osd_storage_explore_select

In the explorer screen, place the cursor on the partition/folder.

Press and hold the <SET> button (for one second or more).

The partition/folder is selected and a checkmark is displayed.

The selected target partition/folder is valid until the storage device is disconnected or the power is turned off. To cancel the selected partition/folder, hold down the <SET> button (for one second or more) again on the selected partition.

Press the <CANCEL> button to deselect all partitions/folders.

Setting a partition name in the explorer screen

When the storage device is [TYPE S], the name (up to 20 characters) can be set to the partition. The preset partition name is displayed in [PARTITION NAME] on the explorer screen.

In the explorer screen, place the cursor on the partition you want to set up.

You can display the thumbnail list and set a name for the partition by pressing the <SET> button.

Press the <MENU> button.

Select [CHANGE PARTITION NAME] in the main menu → [CLIP] and press the <SET> button.

This displays the soft keyboard.

Enter the partition name and select [OK].

The partition name is set.

Deleting the last partition in the explorer screen

You can delete the last partition on a storage device.

In the explorer screen, place the cursor on the last partition.

Select [DELETE LAST PARTITION] in the main menu → [CLIP] and press the <SET> button.

Clip thumbnail display of the storage device

Displaying thumbnails

You can display and manage clips saved in a storage device, as well as display the thumbnail screen for clips saved in a P2 card attached to the camera.

co_osd_clip_thumbnail

Open the explorer screen.

Partitions or folders are displayed in a list.

Use the cursor buttons to place the cursor on the partition or folder you want to display on the thumbnail screen, and press the <SET> button.

This displays the thumbnails of clips in the partition or folder. You can go back to the main explorer screen by clicking the <EXIT> button.

Displaying clip information

You can display each type of metadata of clips saved in a storage device. The display mode is the same as the P2 card clip properties.

In the storage device thumbnail screen, move the cursor to the target clip.

Press the <MENU> button.

Select [CLIP PROPERTY] in the main menu → [CLIP] → [PROPERTY] and press the <SET> button.

This cannot be modified.

Deleting clips

You can delete unnecessary clips saved in a storage device.

In the storage device thumbnail screen, select the clip you want to delete.

Press the <MENU> button.

Select [DELETE] in the main menu → [CLIP] and press the <SET> button.

Move the cursor to [YES] in the confirmation message and press the <SET> button.

Writing back to the P2 card from a storage device (import)

Importing from a [TYPE S] storage device or [P2STORE] by partition

You can import (write back to a P2 card from as storage device) to a P2 card with the same part number as the source card by partition (card).

Insert a P2 card that will serve as the input destination.

Make sure to insert a formatted P2 card.

Connecting a storage device.

Select [STORAGE] in the main menu → [CLIP] → [EXPLORE] to display the explorer screen.

In the explorer screen, display the partition thumbnails to be imported.

Select [IMPORT] in the main menu → [CLIP].

Place the cursor on the import destination P2 card slot number and press the <SET> button.

Start importing by selecting [YES] in the confirmation message.

[COPY COMPLETED!] will be displayed when importing is completed.

Copying to a P2 card by clip

You can specify a storage device clip and copy it to a P2 card.

Open the storage device thumbnail screen.

Select the clip you want to copy.

Press the <MENU> button.

In the main menu → [CLIP] → [COPY] → [STORAGE] list, move the cursor over the copy destination and press the <SET> button.

Start importing by selecting [YES] in the confirmation message.

[COPY COMPLETED!] will be displayed when copying is completed.