- Top
- Description of Parts
- Right side
Right side
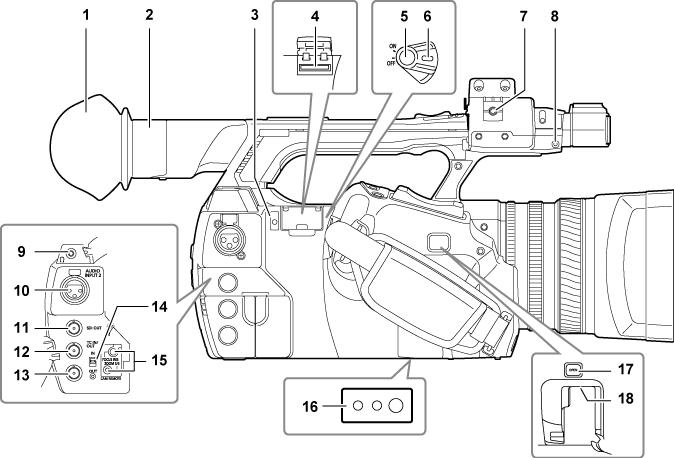
Eye cup (Attaching the eye cup)
Eye piece
Busy (active status indication) lamp (Removing SD memory cards)
Indicate the active status of the SD memory card, and is illuminated when the card is active.
SD memory card slot (Inserting SD memory cards)
This is the insertion slot for the SD memory card (optional). Use the SD memory card for recording/opening the setting menu of the camera, or uploading metadata or proxy recording, etc.
Recording button (grip side) (Shooting)
Press this button to start recording. Press it again to stop recording.
Used for direct shooting in thumbnail mode.
Power switch (Preparation)
Switch on/off the power.
Microphone cable clamp (Attaching the front microphone)
Used for securing the microphone cable.
Pin holder
Attach the zoom ring pin which is removed from the camera.
Headphones terminal (Headphones)
This is the connecting terminal of headphones for audio monitor.
<AUDIO INPUT 2> terminal (XLR, 3-pin) (Using the external microphone and audio device)
Connect the audio equipment or the microphone.
<SDI OUT> terminal (Supplying the time code externally)
This is the output terminal for HD/SD SDI signals.
<TC IN/OUT> terminal (Definition of time data)
This is the input/output terminal for time code.
Use the <IN/OUT> switch to select the input or output.
<GENLOCK IN/VIDEO OUT> terminal (Externally locking the time code)
This is the input terminal for reference signals when setting the genlock to the camera section. This is the output terminal of the video for monitor.
Use the <IN/OUT> switch to switch the input or output.
<IN/OUT> switch (User bits settings)
Switch the input and output of the <TC IN/OUT> terminal and <GENLOCK IN/VIDEO OUT> terminal.
<CAM REMOTE> terminal (Remote control)
Connect the remote control (optional) to control some functions remotely.
<FOCUS IRIS>: (3.5 mm mini jack) Control the focus operation and iris operation remotely.
<ZOOM S/S>: (2.5 mm mini jack) Control the zoom operation and start/stop operation of recording remotely.
Tripod holes
Attach the tripod. (bottom)
Mounting hole size
1/4-20 UNC (screw length 5.5 mm or shorter)
3/8-16 UNC (screw length 5.5 mm or shorter)
<OPEN> button (For the wireless module AJWM30/AJWM50)
Use this button when opening the cover of the <USB2.0 HOST> terminal at the bottom of the button.
<USB2.0 HOST> terminal (sub-host) (For the wireless module AJWM30/AJWM50)
This is the terminal for the wireless LAN. Mount the wireless module AJ-WM30/AJ-WM50 (optional).