Starting application (P2 Browser) from web browser
After completing the network connection with your mobile device or computer, start the browser of the mobile device or computer, and then start the application (P2 Browser).
Select [BROWSE] or [BROWSE (+CTRL)] in the main menu → [NETWORK SETUP] → [NETWORK FUNC] → [HTTP SERVER].
P2 browser function is enabled.
Start the browser of your mobile device or computer (Safari, Internet Explorer).
Enter the IP address set for the camera in the address entry field of the browser.
When [DHCP] is set to [ENABLE] in [INFRA] mode, check the IP address of the camera from the main menu → [NETWORK SETUP] → [NETWORK TOOLS] → [STATUS DISPLAY].
Factory setting: [192.168.0.1]
If you use a computer, press the Enter key, and if you use iPad/iPhone, tap the GO button.
The web application (P2 Browser) starts up.
Enter [USER NAME] and [PASSWORD] on the entry screen.
Enter [USER NAME] (Factory setting: [guest]) and [PASSWORD] (Factory setting: [p2guest]) of [USER ACCOUNT] that have been set for the camera.
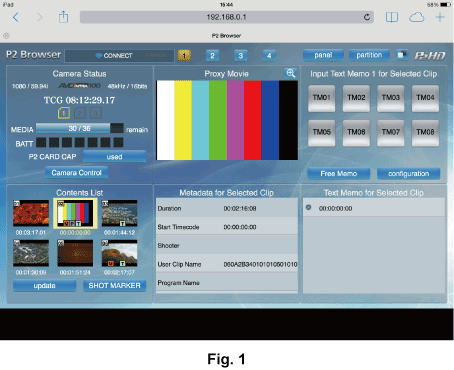
When a screen like (Fig. 1) appears (for iPad), the connection has been established.
User account name and password can be set in the main menu → [NETWORK SETUP] → [NETWORK FUNC] → [USER ACCOUNT].
Accounts can be created or deleted, and the passwords can be changed in the main menu → [NETWORK SETUP] → [NETWORK FUNC] → [ACCOUNT LIST].
Enter up to 31 characters for a user account name, and characters between 6 and 15 for a password.
For information on P2 Browser, refer to the User Guide of “P2 Web Application” on the following website: