Connecting to external devices in USB host mode

You can save data on cards or other operations by connecting a storage device such as hard disk drive or solid-state drive that can be connected via USB 2.0 or USB 3.0 to the <USB3.0 HOST> terminal.

Switching to the USB host mode

co_body_connect_USB3.0
co_osd_usb_storage_mode

Connect the storage device to the <USB3.0 HOST> terminal. (Fig. 1)

  • When connecting a storage device which supports USB 3.0, use a cable that conforms to the USB 3.0 standard.

  • When a USB 2.0 cable is used, the transfer rates cannot be faster than the ability of USB 2.0.

  • If the storage device is recognized and is usable, imageicon_usb_dark (gray) on the top right of the thumbnail screen changes to imageicon_usb_white (white).

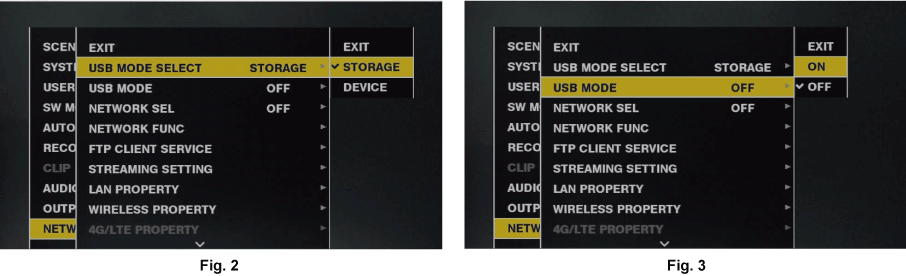
Set to [STORAGE] in the main menu → [NETWORK SETUP] → [USB MODE SELECT]. (Fig. 2)

For details, refer to “Setting menu basic operations”.

Set [ON] in the main menu → [NETWORK SETUP] → [USB MODE]. (Fig. 3)

  • The camera is switched to the USB host mode.

  • While in USB host mode, [USB STORAGE CONNECTED] is displayed in the center of the viewfinder or LCD monitor. If the USB connection is being moved or the hard disk drive is not connected properly, [USB STORAGE CONNECTING...] is displayed.

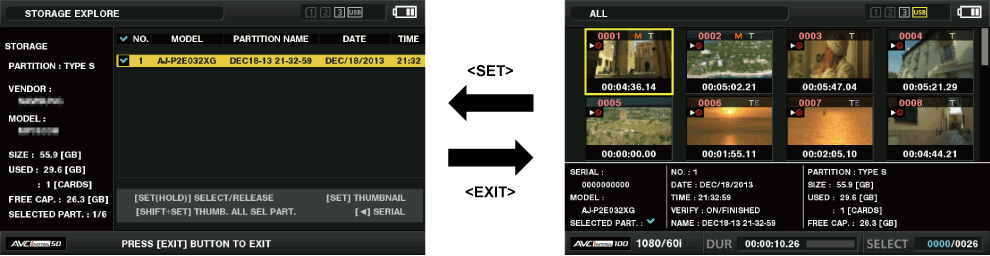
Press the <THUMBNAIL> button.

  • The thumbnail screen is displayed.

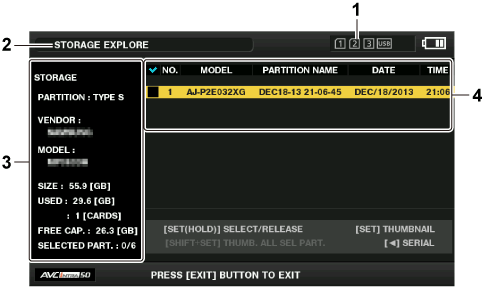
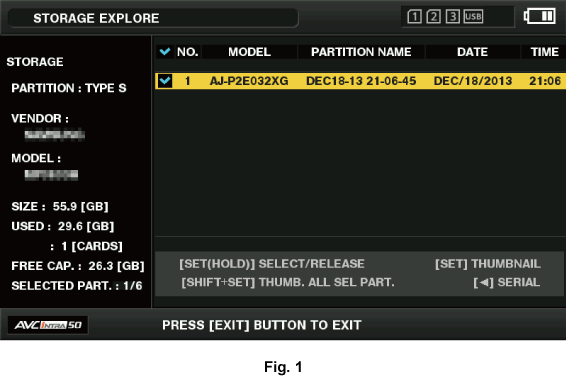
  • Ensure that [USB] is displayed at the top right of the screen.

  • If a storage device is connected, the icon that indicates storage device status at the top right illuminates. However, a red mark indicates that the device cannot be used.

    For details on USB host mode, refer to “Connecting to external devices in USB host mode”.

Exit the USB host mode.

There are two methods:

  • Turn the power switch of the camera to <OFF>.

  • With the thumbnail screen closed, set [OFF] in the main menu → [NETWORK SETUP] → [USB MODE].

  • Press the USER button to which [USB MODE] has been assigned. Note that this is disabled when a menu or thumbnail is open.

Storage device types and available functions

The available functions differ depending on the storage device you will use. The storage device type is displayed after [PARTITION] on the left side of the storage device explorer screen.

For details, refer to “Storage device information display (explorer screen)”.

P2 memory card, or microP2 memory card with 32 GB or lower

microP2 memory cards that exceed 32 GB

Playback from the storage device cannot be performed on the camera. Import the contents to the P2 card to play them back.

If you perform additional clip writing, you will not be able to write back to that partition by card.

Storage devices with a capacity of 2 TB or more cannot be formatted.

Formatting a storage device

You can initialize the storage device to a usable format using the [TYPE S] or the [FAT] file system.

co_osd_storage_format

Select [STORAGE] in the main menu → [CLIP] → [EXPLORE] and press the control stick.

This opens the explorer screen.

Select the desired format ([TYPE S], [FAT]) in the main menu → [CLIP] → [FORMAT(STORAGE)] and press the control stick. (Fig. 1)

Select [YES] in the confirmation message and press the control stick.

Select [YES] again when the confirmation message appears, and press the control stick.

This formats the storage device.

Exporting to a storage device by card

You can export to a storage device (write to a storage device from a P2 card) by P2 card. The copy results and the maximum number of items that can be copied vary depending on format type of the storage device. You cannot perform copying once the capacity of the storage device is exceeded.

co_osd_storage_export

Copying to a storage device by clip

You can copy only the selected clips to a storage device.

Go to the thumbnail screen. Use the control stick to place the cursor on a clip you want to copy and press the control stick.

You can also select multiple clips.

Select [STORAGE] in the main menu → [CLIP] → [COPY] and press the control stick.

A list of folders or partitions in the storage device is displayed.

Select the copy destination and press the control stick.

Select [YES] in the confirmation message and press the control stick.

This starts the copying process. A progress bar is displayed during copying.

[COPY COMPLETED!] will be displayed when copying is completed.

Storage device information display (explorer screen)

You can perform the following operations in the explorer screen display.

  • Storage device information display

  • Storage device partition or folder thumbnail display and selection

  • Target partition or folder selection

To display the explorer screen, select [STORAGE] in the main menu → [CLIP] → [EXPLORE] and press the control stick.

osd_storage_explorer_ex
  1. Storage device indicator

    This displays the connected / not connected status and the storage device type.

  2. Display mode

    This indicates that the explorer screen of the storage device is currently displayed.

  3. Device information

    For [TYPE S] and [P2STORE] (storage devices that allow reading/writing by card)

    [PARTITION]

    [TYPE S]/[P2STORE]

    [VENDOR]

    Vendor name

    [MODEL]

    Model name

    [SIZE]

    Total capacity (unit: GB)

    [USED]

    Used capacity (unit: GB)

    Used P2 card area (unit: number of clips), maximum of 23

    [FREE CAP.]

    Remaining capacity (unit: GB)

    [SELECTED PART.]

    Number of partitions selected

    For [FAT] and [OTHER] (other storage devices)

    [PARTITION]

    [FAT]/[OTHER]

    [VENDOR]

    Vendor name

    [MODEL]

    Model name

    [SIZE]

    Total capacity (unit: GB)

    [FREE CAP.]

    Remaining capacity (unit: GB)

    [SELECTED PART.]

    Number of folders selected

  4. Partition or folder information

    For [TYPE S] and [P2STORE] (partition information)

    indicator_select

    Displays a checkmark when a target partition is selected

    [NO.]

    Partition number

    [MODEL]

    P2 card model name

    [PARTITION NAME]

    Name assigned to the partition

    [DATE]

    Partition record date

    [TIME]

    Partition record time

    [SERIAL]

    P2 card serial number

    For [FAT] and [OTHER] (folder information)

    indicator_select

    Displays a checkmark when a target partition is selected

    [NO.]

    Folder number

    [FOLDER NAME]

    Folder name (excluding the CONTENTS folder)

    [DATE]

    Folder creation date

    [TIME]

    Folder creation time

Selecting the target folder/partition in the explorer screen

You can display all clips included in the selected partition/folder as thumbnails by selecting partitions/folders as targets. You can display up to six partitions/folders. When the seventh partition/folder is specified, setting is disabled and a warning is displayed.

co_osd_storage_explore_select

In the explorer screen, place the cursor on the partition/folder.

Press and hold the control stick (for one second or more).

The partition/folder is selected and a checkmark is displayed. (Fig. 1)

The selected target partition/folder is valid until the storage device is disconnected or the power is turned off. To release the selected partition/folder, hold down the control stick (for one second or more) again on the selected partition.

Press the <CANCEL> button to deselect all partitions/folders.

Setting a partition name in the explorer screen

When the storage device is [TYPE S], the name (up to 20 characters) can be set to the partition. The preset partition name is displayed in [PARTITION NAME] on the explorer screen.

In the explorer screen, place the cursor on the partition you want to set up.

You can display the thumbnail list and set names for partitions by pressing the control stick.

Select [CHANGE PARTITION NAME] in the main menu → [CLIP] and press the control stick.

This displays the soft keyboard.

Enter the partition name and select [OK].

The partition name is set.

Deleting the last partition in the explorer screen

You can delete the last partition on a [TYPE S] type storage device.

In the explorer screen, place the cursor on the last partition.

Select [DELETE LAST PARTITION] in the main menu → [CLIP] and press the control stick.

Clip thumbnail display of the storage device

Displaying thumbnails

You can display and manage clips saved in a storage device, as well as display the thumbnail screen for clips saved in a P2 card attached to the camera.

co_osd_clip_thumbnail

Open the explorer screen.

Partitions or folders are displayed in a list.

Use the control stick to place the cursor on the partition or folder you want to display on the thumbnail screen, and press the control stick.

This displays the thumbnails of clips in the partition or folder. You can go back to the main explorer screen by clicking the <EXIT> button.

Displaying clip information

You can display metadata of clips saved in a storage device. The procedure to display is the same as that of the P2 card clip properties.

In the storage device thumbnail screen, move the cursor to the target clip.

Select [CLIP PROPERTY] in the main menu → [CLIP] → [PROPERTY] and press the control stick.

This cannot be modified.

Deleting clips

You can delete unnecessary clips saved in a storage device.

In the storage device thumbnail screen, select the clip you want to delete.

Select [DELETE] in the main menu → [CLIP] and press the control stick.

Move the cursor to [YES] in the confirmation message and press the control stick.

Writing back to the P2 card from a storage device (import)

Importing from a [TYPE S] storage device or [P2STORE] by partition

You can import (write back to a P2 card from as storage device) to a P2 card with the same part number as the source card by partition (card).

Insert a P2 card that will serve as the input destination.

Make sure to insert a formatted P2 card.

Connecting a storage device.

Select [STORAGE] in the main menu → [CLIP] → [EXPLORE] to display the explorer screen.

In the explorer screen, display the partition thumbnails to be imported.

Select [IMPORT] in the main menu → [CLIP].

Place the cursor on the P2 card slot number of the import destination and press the control stick.

Start importing by selecting [YES] in the confirmation message.

[COPY COMPLETED!] will be displayed when importing is completed.

Copying to a P2 card by clip

You can specify a storage device clip and copy it to a P2 card.

Open the storage device thumbnail screen.

Select the clip you want to copy.

In the main menu → [CLIP] → [COPY] → [STORAGE] list, move the cursor over the copy destination and press the control stick.

Start importing by selecting [YES] in the confirmation message.

[COPY COMPLETED!] will be displayed when copying is completed.