It is possible to edit and rewrite the recorded clip metadata while clip properties are displayed.
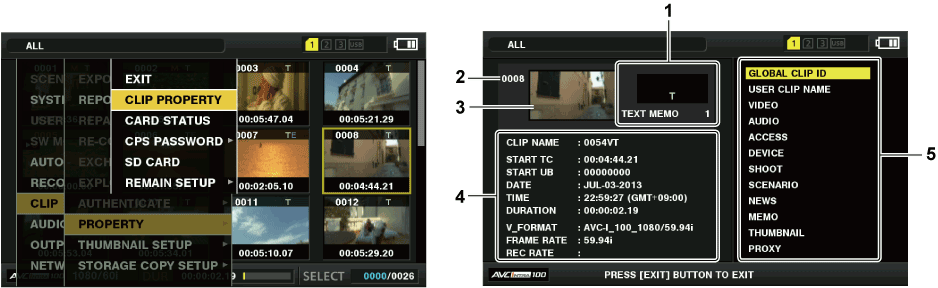
Clip properties
Select [CLIP PROPERTY] in the main menu → [CLIP] → [PROPERTY].
Clip information
Displays the indicators added to the clip and the number of added text memos.
The mark will be displayed if the P2 card in which the clip is recorded is write-protected.
Clip number
Thumbnail
Clip information
Displays detailed information about the clip.
[CLIP NAME]
Displays clip names.
[START TC]
Displays the time code value at the start of the recording.
[START UB]
Displays the user bit value at the start of the recording.
[DATE]
Displays the date of the recording.
[TIME]
Displays the time at the start of recording.
[DURATION]
Displays the time length of the clip.
[V_FORMAT]
Displays the recording format of the clip.
[FRAME RATE]
Displays the frame rate for playback.
[REC RATE]
Displays the recording frame rate. For the clips recorded with variable frame rate compatible devices, the frame rate at the time of shooting is displayed.
Clip metadata
The items for referencing clip properties (clip metadata) are displayed.
The input window (soft keyboard) for modifying metadata is displayed. (Fig. 2)
Enter characters with the keyboard to modify the metadata.
Press the [OK] button on the keyboard.
The modified metadata is written on the clip and the screen returns to the metadata details window.
Displaying P2 card status
Contents of P2 card status display settings
Select [CARD STATUS] in the main menu → [CLIP] → [PROPERTY].
Write-protected mark
The mark appears when the P2 card is write-protected.
P2 card status (remaining capacity)
The remaining memory capacity of the P2 card is shown as a bar graph and percentage. The bar graph indicator moves to the left as the remaining capacity decreases.
The following displays may also appear, depending on the card status.
[FORMAT ERROR!]
An unformatted P2 card is inserted.
[NOT SUPPORTED!]
An unsupported card is inserted.
[NO CARD]
No P2 card is inserted.
[AUTH NG CARD]
Indicates that the card is a microP2 memory card which cannot authenticate a CPS password.
Use the control stick to place the cursor on the P2 card where data to be accessed is saved and press the control stick to display detailed information on the P2 card. Specific information such as the serial number can be checked. (Fig. 1)
When the maximum number of clips that can be recorded in the P2 card has been reached, [OVER MAX NUMBER CLIPS] is displayed in the P2 card detailed information showing that the upper limit has been reached.
Warning card mark
When P2 cards are the following status, the mark is displayed.
[RUN DOWN CARD]
The maximum number of overwrites on the P2 card has been exceeded.
[DIR ENTRY NG]
The directory structure on the P2 card is not supported.
Total slot memory remaining capacity (or used capacity)
This displays the total remaining memory capacity (or used capacity) of the three slots.
The available space of a write-protected P2 card is not included in the total available space.
P2 card remaining capacity (or used capacity) / total capacity
This displays the remaining capacity (or used capacity) / total capacity of the P2 card. Since only the figures in minutes are displayed, the remaining memory capacity (or used capacity) for each P2 card may not match the total capacity.
Setting CPS password
To set a CPS password, either load the password from the SD memory card or use the menu of the camera to enter the password.
Only one CPS password can be set on the camera. Loading the CPS password again overwrites the previously saved password.
Loading CPS password from SD memory card
Download and install the latest P2 Viewer Plus into a computer.
With P2 Viewer Plus, generate a CPS password and write it to the SD memory card.
Load the CPS password file.
Start the camera, and insert the SD memory card into the SD card slot.
Open the thumbnail screen and select [LOAD] in the main menu → [CLIP] → [PROPERTY] → [CPS PASSWORD].
The password file list is displayed.
Select the file to be used and press the control stick.
When loading of the CPS password has succeeded, the message [LOADING PASSWORD COMPLETED!] is displayed.
When loading of the CPS password has failed, a warning message is displayed. For an explanation of warnings, refer to “Warning system”.
Setting CPS password using the menu of the camera
Open the thumbnail screen and select [SET] in the main menu → [CLIP] → [PROPERTY] → [CPS PASSWORD].
The software keyboard to enter the CPS password is displayed.
Enter the CPS password with the keyboard.
Enter [PASSWORD] and [RETRY PASSWORD] for verification, and select [OK] to set the CPS password.
When entry of the CPS password has succeeded, the message [SETTING PASSWORD COMPLETED!] is displayed.
When entry of the CPS password has failed, the warning message is displayed. For warnings description, refer to “During thumbnail and menu operation”.
Deleting CPS password
When the CPS function is no longer used, delete the CPS password.
Open the thumbnail screen and select [DELETE] in the main menu → [CLIP] → [PROPERTY] → [CPS PASSWORD].
[DELETING PASSWORD COMPLETED!] is displayed and the CPS password is deleted.
Manual CPS authentication
An encrypted microP2 memory card is authenticated on the camera automatically, and can be used only if the authentication has succeeded.
Authentication fails if the CPS password set to device and the CPS password set to microP2 memory card differ. To temporarily use a microP2 memory card whose authentication has failed, manually enter the CPS password authorized for the microP2 memory card in accordance with the following procedures. If the code matches, you can use the card.
Confirm that authentication has failed.
Open the thumbnail screen and select [CARD STATUS] in the main menu → [CLIP] → [PROPERTY].
For the card whose authentication has failed, the slot number frame at the top right of the screen turns red, and [AUTH NG CARD] is displayed on the remaining capacity bar. Select the card by pushing the control stick upward/downward.
Perform manual authentication.
On the card status screen, select [AUTHENTICATE] in the main menu → [CLIP].
The software keyboard to enter the CPS password is displayed.
Enter the password set on the microP2 memory card and select [OK].
When entry of the CPS password has succeeded, the message [AUTHENTICATED SUCCESSFULLY!] is displayed.
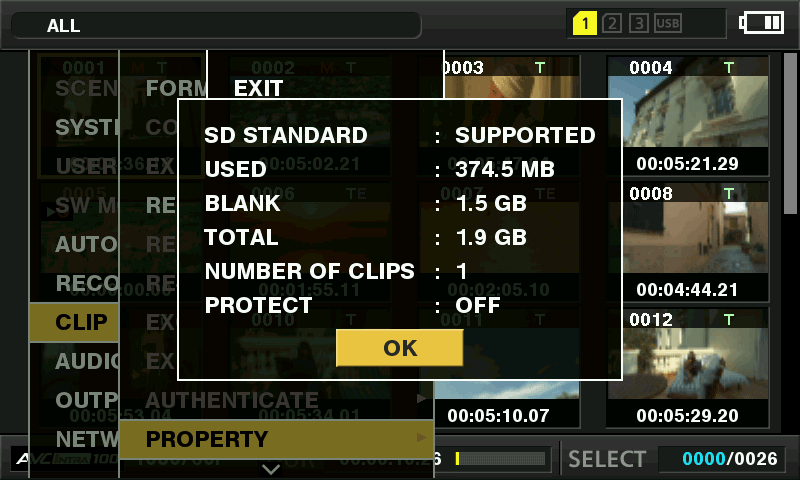
The status display enables confirmation of the SD memory card format condition, available memory space, etc.
Select [SD CARD] in the main menu → [CLIP] → [PROPERTY]. The same information can be displayed from the main menu → [CARD FUNCTIONS] → [SD CARD PROPERTY].
[SD STANDARD]
Indicates whether an SD memory card is formatted according to the SD/SDHC/SDXC standard.
[SUPPORTED]: Complies with SD/SDHC/SDXC standards
[NOT SUPPORTED]: Does not comply with SD/SDHC/SDXC standards
[USED]
Used capacity (bytes)
[BLANK]
Available space (bytes)
[TOTAL]
Total capacity (bytes)
[PROXY REM]
Remaining capacity for proxy recording
[NUMBER OF CLIPS]
The number of clips on an SD memory card when clips have been copied to an SD memory card
 mark will be displayed if the P2 card in which the clip is recorded is write-protected.
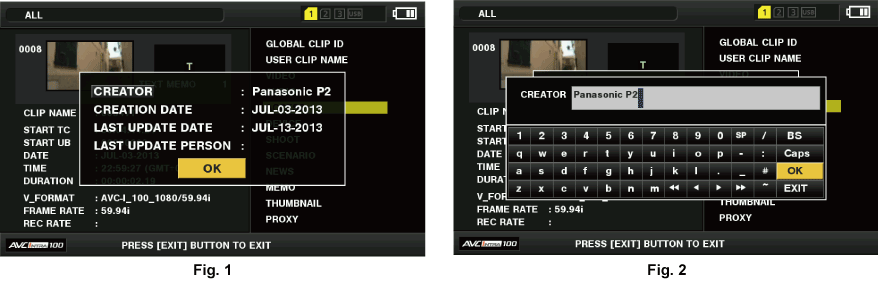
 mark is displayed.